Part 7. Cross-Cutting Concerns and Extendable Infrastructure
In the previous posts, we composed a basic version of the application that handled the main use cases. In this post, we will discuss functionality that is related to business logic indirectly: infrastructure expansion, analytics, alert monitoring, logging, and so on.
Types of Code and Density
In applications, in addition to business logic code, there is also “supporting” code that is not directly related to the domain. It can be “glue” that connects different parts of the application and third-party tools together, or “non-primary” functionality that is indirectly needed by the business, such as analytics or monitoring.
Usually, the more complex the application, the lower the proportion of business logic and the more supporting code it has. We can call this relationship the density: the more supporting code, the lower the logic density. Business rules in it are as if “diluted” by various auxiliary things.
The main danger of low density is that the logic can “dissolve” and “get lost” in the supporting glue. However, business logic and “glue” change for different reasons and with different speeds, so ideally they should be clearly separated and not interfere with each other’s work.
On the other hand, supporting code is often difficult to place and encapsulate in any one part of the application because its functionality is used by multiple other modules.
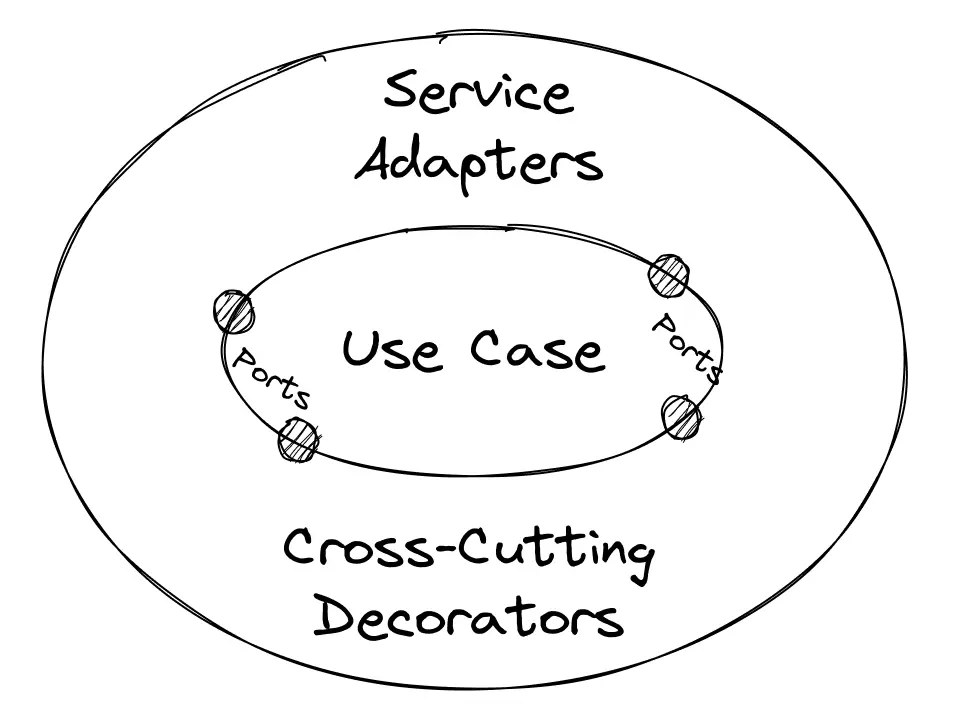
To work conveniently with such code, we can try to divide it into a “service” part that does not depend on the domain, and an “adapter” part that will contain knowledge specific to our application. In this post, we will look at how achievable this is and what limitations may arise along the way.
Logging and Analytics
Let’s say that the product owners want to conduct a UX experiment and for that, we need to collect data on how users interact with the application. We need to integrate an analytics service that would register actions on the screen.
In our case, the third-party analytics service will be this code:
// services/analytics
export const sendEvent: SendEvent = async (event, payload) => {
	const dateTime = new Date().toISOString();
	const eventData = payload ? `Additional data: ${payload}` : '';
	const message = `[Analytics ${dateTime}]: Captured event “${event}”. ${eventData}`;
	console.log(message);
};
…That implements the SendEvent type:
// shared/kernel
type SendEvent = (event: string, payload?: string) => Promise<void>;
We don’t really care about how events are registered at the moment, so we’re just outputting them to the console. At this point, there could be a request to some service like Google Analytics, Firebase, or another.
Let’s say we want to link the call to this service with, for example, a click on the “Refresh Rates” button. The simplest way to do this is to put the service in the use case dependencies and call it:
// core/refreshRates

type Dependencies = {
	fetchRates: FetchRates;
	readConverter: ReadConverter;
	saveConverter: SaveConverter;

	// New dependency:
	sendAnalytics: SendEvent;
};

export const createRefreshRates =
	({ fetchRates, readConverter, saveConverter }: Dependencies): RefreshRates =>
	async () => {
		// Sending the analytics event:
		sendAnalytics('CLICKED_CONVERTER_BUTTON_OR_WHATEVER');

		// ...The rest of the code.
	};
This is a working solution, but it has a problem. The use case didn’t know anything about analytics and wasn’t dependent on this service, so analytics actually has nothing to do with the use case.
Analytics is important for the business, but it is not a part of the domain model. We can conclude that it is “cross-cutting” code, and we shouldn’t mix it directly with the use case function. We can improve the situation by using decorators.
Composition in Decorators
A decorator is a function that enriches another function with some additional functionality. In our case, decorators will “attach” different “additional” calls like analytics to user cases.
Let’s create a function withAnalytics, which will expect the RefreshRates use case as input:
// infrastructure/analytics

export const withAnalytics =
	// Accept `RefreshRates` as an argument,
	// return `RefreshRates` as the result:


		(refresh: RefreshRates): RefreshRates =>
		async () => {
			// Calling the service:
			sendEvent('CLICKED_CONVERTER_BUTTON_OR_WHATEVER');

			// Calling the real use case
			// and returning its result:
			return await refresh();
		};
Note that the result of the decorator’s work is a new function that implements the same type as the decorator argument. Thus, the decorator enriches the use case, but does not change its public interface. This means that to compose this decorator together with the use case, we only need to wrap the use case function with it:
// core/refreshRates.composition

export const refreshRates: RefreshRates = withAnalytics(
	createRefreshRates({
		fetchRates,
		readConverter,
		saveConverter
	})
);
This allows us to easily compose multiple decorators together, enriching the use case with “additional” functionality without modifying its code.
Benefits of Decorators
Decorators encapsulate all the knowledge about how to work with the analytics specific to a particular feature. The name of the event, the order of the call, and the data that needs to be passed along with the call—all of this is located in one place and not scattered throughout the codebase.
Mixing or removing a specific part of functionality with decorators becomes easier because we only need to add or remove a specific function, without digging into the source code of the use case itself. And the unchanged interface of the use case itself helps to conveniently compose calls.
In general, the idea of decorator composition is not new. If you have worked with OOP code, you are probably familiar with validating or logging decorators. Here we use the same idea, but in the form of a function rather than a class.
Limitations of Decorators
If it’s important for us to run analytics in the middle of a use case or depending on certain conditions, a decorator may not be suitable. In such cases, it is generally not too bad to insert a service call into the logic code, but by default, it is worth considering whether this can be avoided.
In addition, a call, such as for analytics, may require data from other restricted contexts. How to solve this depends on the specific project conditions, but you can look towards extracting a Shared Kernel, a common context, or decoupled communication between features. We will talk more about the latter in detail in the next two posts 🙃
Alert Monitoring
In addition to the main error handling mechanisms, it can also be useful to track specific errors in certain use cases. This can be conveniently done with decorators, too.
Let’s create the withAlertMonitor decorator, specify the dangerous function as an argument, and return a function wrapped in try-catch that implements the same interface:
// shared/error-handling

const withAlertMonitor =
	(workflow: T): T =>
	() => {
		try {
			// Try to invoke a dangerous operation:
			return workflow();
		} catch (error) {
			//
			// If there's an error we're interested in,
			// send it to the alert monitoring service:
			if (error instanceof DomainError) {
				captureError(error);
			}

			// Finally, re-throw the error up,
			// so that the main error handling mechanism
			// could handle it and, say, tell the user about it:
			throw error;
		}
	};
Decorators can also be used for error handling itself, not just monitoring. It all depends on the project requirements and how the handling is implemented.
In this example, we assume that we handle errors at the top level, and in decorators, we only report them to the monitoring service. We could use such a decorator like this:
// core/refreshRates.composition

import { withAlertMonitor } from '~/shared/error-handling';

export const refreshRates: RefreshRates = withAlertMonitor(
	createRefreshRates({
		/*...*/
	})
);
Performance Profiling
Another scenario for using decorators is performance profiling. For example, to measure how long it takes for a use case to execute, we could write a function like this:
// infrastructure/performance

import type { RefreshRates } from '../../core/ports.input';

export const withPerfMeasure =
	(fn: RefreshRates): RefreshRates =>
	async () => {
		const start = performance.now();
		await fn();
		const end = performance.now();
		console.log(`RefreshRates took ${end - start}ms.`);
	};
And then wrap in it the function we’re interested in:
// ...
import { withBenchmark } from '../../infrastructure/performance';

export const refreshRates: RefreshRates = withBenchmark(
	createRefreshRates({
		/*...*/
	})
);
The profiling decorator can also be generic so that it’s convenient to use it with different functions.
Persistence
Most of the state management libraries usually provide tools for saving data to the device’s local storage. For example, Zustand has a separate package for persistence.
However, sometimes such tools may not exist, or they may not be customizable enough. In such cases, we can write data saving ourselves. For example, first let’s describe the data saving “service”:
// shared/kernel

type Persist = <T>(key: PersistenceKey, value: T) => void;
type Retrieve = <T>(key: PersistenceKey) => Nullable<T>;

// services/persistence

export const persist: Persist = (key, value) =>
	window.localStorage.setItem(key, JSON.stringify(value));

export const retrieve: Retrieve = (key) => {
	const value = window.localStorage.getItem(key);
	return value ? JSON.parse(value) : null;
};
Next, we’ll describe a decorator that will wrap the SaveConverter output port:
// infrastructure/persistence

const key = 'converter-app:rates';

export const withPersistence =
	(fn: SaveConverter): SaveConverter =>
	(converter) => {
		persist(key, converter.rates);
		return fn(converter);
	};
Then, we’ll be able to compose persistence with the service:
// infrastructure/store.composition

import { withPersistence } from '../persistence';

const saveConverter = withPersistence(converter.setState);
Composition of Multiple Decorators
As we mentioned earlier, decorators preserve the type of the function they enhance with new functionality. This means that one use case can be wrapped in multiple decorators at once:
export const refreshRates: RefreshRates = withAlertMonitor(
	withAnalytics(
		withBenchmark(
			createRefreshRates({
				fetchRates,
				readConverter,
				saveConverter
			})
		)
	)
);
For aesthetics, you can use functional utilities like pipe or compose to make the chain look a bit flatter:
export const refreshRates: RefreshRates = pipe(
	// Decorators, in order of applying them:
	withBenchmark,
	withAnalytics,
	withAlertMonitor
)(
	// Use case “baking”:
	createRefreshRates({
		fetchRates,
		readConverter,
		saveConverter
	})
);
This way, the separation of logic and “additional” functionality will be expressed directly in the code, and adding or removing a new decorator will only involve changing the list inside pipe.
Switching Tools and Extending Infrastructure
In addition to using decorators, this method of composition creates a “buffer zone” between different modules of the app allowing for updating or expanding the infrastructure if needed. We have already touched on this topic in the previous post, when discussing replacing the state manager, now let’s look at other options.
API Client
For example, if we need to replace fetch with axios, it will be enough to implement the ApiRequest<T> type:
// services/network

import axios from 'axios';

export const get = (url: Url) =>
	axios
		.request({ ...config, url })
		.then((response) => response.data)
		.catch((cause) => {
			throw new Error('Failed to perform request', { cause });
		});
Since the public API of the module hasn’t changed, the composition of this service and interaction with other layers of the application will remain the same as it was.
Localization
Localization is a bit more complex topic. It can be either simply part of the UI or somehow intertwined with the use case logic; it depends on the project. In our converter, we can isolate localization at the UI layer level, so it will be sufficient to update the components:
type Localize = (key: string) => LocalizedString;

type BaseValueInputDeps = {
	updateBaseValue: UpdateBaseValue;
	useBaseValue: SelectBaseValue;

	// Declare the localizer as a dependency:
	useLocales: Provider<Localize>;
};

export function BaseValueInput({ updateBaseValue, useBaseValue, useLocales }: BaseValueInputDeps) {
	// Use it inside the component:
	const l = useLocales();

	return (
		<label>
			<span>{l('BaseValueInput.Label')}:</span>
			{/* ... */}
		</label>
	);
}
Then, we’ll update composition, passing the localization service:
// ui/BaseValueInput.composition
// ...
import { useLocales } from '~/shared/ui/localization';

export const BaseValueInput = () => Component({ updateBaseValue, useBaseValue, useLocales });
Again, as we discussed in one of the previous posts, the “explicit composition” might not be necessary. If so, we can import the service directly:
export function BaseValueInput() {
	// Import the localizer and use it directly:
	const l = useLocales();

	return (
		<label>
			<span>{l('BaseValueInput.Label')}:</span>
			{/* ... */}
		</label>
	);
}
In the latter case, for testing purposes, a localization provider may be required if we use a library that depends on the context.
Caching and Deduplication
If we need to deduplicate or cache server requests, we can extend the tooling by adding a library for that. Most network libraries currently use hooks, so we will use them in the example too.
We already have an infrastructure hook that turns an asynchronous use case into a “command result” for the UI. Let’s extend it and add useSWR there:
// shared/cqs.swr

type RequestId = List<Unique<string>>;

// Adding a request ID by which we will
// deduplicate requests and cache the results:
export const asCommand =
	<F extends AsyncFn>(command: F, requestId: RequestId): Provider<Command<F>> =>
	() => {
		const [run, setRun] = useState(false);
		const { data, error, isLoading } = useSWR(run ? requestId : null, command);
		// Under the hood we call useSWR.
		// I don't really like how they recommend
		// to “defer” the call with `null` in their docs,
		// but whatever.

		const execute = (() => setRun(true)) as F;
		const status: Status = isLoading ? 'pending' : !!error ? 'failure' : 'idle';
		const result = { is: status, data, error };
		// We adapt the result of the `useSWR` call to the required interface,
		// so that all components relying on `asCommand` continue to work as before.

		return { execute, result };
	};
Since we have added a new argument to asCommand, we need to add this argument to the composition of components that use it:
// ui/RefreshRates.composition

export const RefreshRates = () =>
	Component({ useRefreshRates: asCommand(refreshRates, ['refresh']) });
…The rest will remain unchanged.
There’s a weird quirk though: with this implementation, we have to pass to useSWR not only the network request function but the whole use case. It seems “not quite right” because useSWR is specifically a tool for working with the network. On the other hand, we would still have to restart the use case after updating the data, so I decided that it was “good enough”.
But again, it’s not a “tutorial” for writing production code but just an idea of splitting composition of different functionality. It might not fit real-project code because of its “non-standardness”.
Next Time
In this post, we discussed cross-cutting concerns and infrastructure extension. Next time, we’ll add a new feature to the application and see how to build vertical slices and why they are useful.
Sources and References
Links to books, articles, and other materials I mentioned in this post.
Architecture and Design
- Cross-cutting concern, Wikipedia
- Decorator composition
- More functional pits of success
- More than concentric layers
- Encapsulation as Means for Abstraction
Error Handling
Networking
Other Topics
- Decorator Pattern
- Generics in TypeScript
- Open–closed principle, Wikipedia
- A quick introduction to pipe() and compose() in JavaScript
zustand-persist
Table of Contents for the Series
- Introduction, assumptions, and limitations
- Modeling the domain
- Designing use cases
- Describing the UI as an “adapter” to the application
- Creating infrastructure to support use cases
- Composing the application using hooks
- Composing the application without hooks
- Dealing with cross-cutting concerns (this post)
- Extending functionality with a new feature
- Decoupling features of the application
- Overview and preliminary conclusions