Let’s Create a Binary Adder in the Game of Life!
After I read “Code” by Charles Petzold, I wanted to create a logic circuit and visualize its work: how the signals travel, what is the core of a logic gates, etc.
The first thing I remembered was the Matt Parker’s computer made out of dominoes. I wanted to create something like that.
A bit after, I remembered that I always wanted to write the Game of Life but didn’t have time to do that. Those two ideas merged together and I thought about this series 😃
In these 3 posts, we’re going to implement a binary calculator that will take 2 two-bit numbers and add them together.
- In the first post, we will implement the Game of Life itself and the module for drawing on
canvas. - In the second post, we will research some of the patterns in the Game of Life and figure out the most suitable for creating a logic gate; then we’ll implement NOT, AND, OR, and XOR gates;
- In the last post, we’ll implement the binary half adder and binary full adder circuits that we will use to compose the calculator.
As a result, we’re going to create an app that takes 2 two-bit numbers and visualizes signals traveling to calculate the answer.
Source code will be available on GitHub.
Game of Life Rules
Conway’s Game of Life is a world made out of cells where each cell can be alive or dead.
Each cell has 8 neighbors around. Each of them can also be alive or dead.
Alive and dead cells affect how the world is going to evolve. Cells are born and die by the given rules:
- cell is born if it has exactly 3 alive neighbors;
- cell survives if it has 2 or 3 alive neighbors;
- in other cases cell dies from overpopulation (if there are too many alive around) or from ”loneliness“ (if there are too few).
These rules help to create stable patterns of cells that can be used as signals. But that’s in the future, right now let’s focus on implementing the rules.
Cells and Neighbors
First, let’s decide how to store the population. The world is in 2D so each cell’s position is described by 2 coordinates:
- x, the horizontal;
- y, the vertical.
We can use a 2D array that stores either 1 or 0 for alive or dead cells accordingly.
const population = [
	[0, 0, 1],
	[0, 1, 0],
	[1, 1, 1]
];
This can be done but for bigger worlds (and the adder will be huge) it isn’t going to work. This configuration forces us to store much more data than we actually need.
Instead, we will store only the alive cells and we will use an object instead of an array to make it more convenient to get values:
const population = {
	'2:0': cell1,
	'1:1': cell2,
	'0:2': cell3,
	'1:2': cell4,
	'2:2': cell5
	// …
};
Each cell is going to be an object with 2 fields that will store coordinates. Let’s write a factory for creating cells:
// life/agent.js

export function createAgent(x, y) {
	return { x, y };
}
On each step, we’ll check every alive cell and its neighbors to define which of them survive or get born.
// life/agent.js

export function isAlive(agent, population) {
	return !!population[`${agent.x}:${agent.y}`];
}
If the population contains a cell with given coordinates it is alive:
const population = {
	'5:5': { x: 5, y: 5 }
};

isAlive({ x: 5, y: 5 }, population); // true
isAlive({ x: 0, y: 5 }, population); // false
To calculate the number of alive neighbors we’re going to need to find them first:
// life/agent.js

export function neighborsOf({ x, y }) {
	return [
		// Neighbors above:
		{ x: x - 1, y: y - 1 },
		{ x, y: y - 1 },
		{ x: x + 1, y: y - 1 },

		// ...On either side:
		{ x: x - 1, y },
		{ x: x + 1, y },

		// ...And below the given cell:
		{ x: x - 1, y: y + 1 },
		{ x, y: y + 1 },
		{ x: x + 1, y: y + 1 }
	];
}
…And then calculate how many are alive:
// life/agent.js
export function countAliveAround(agent, population) {
return neighborsOf(agent).reduce((total, agent) => {
return total + (isAlive(agent, population) ? 1 : 0);
}, 0);
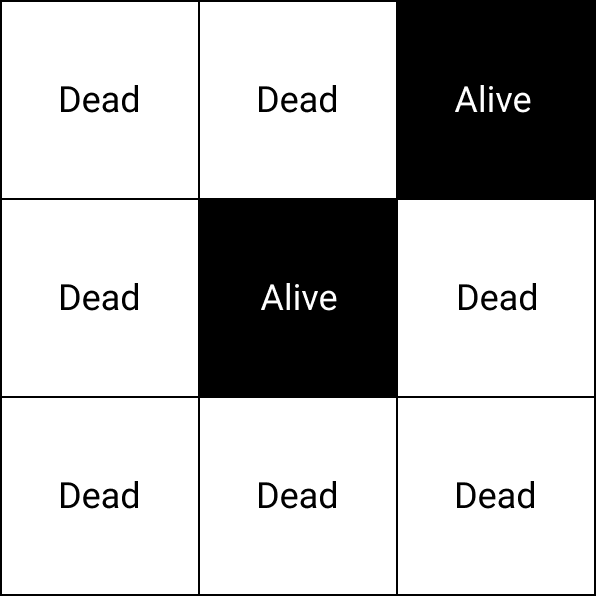
}Thus, in this population the cell at 1:1 is going to have 4 alive neighbors:
// Alive  Dead    Alive
// Alive  Current Dead
// Dead   Alive   Dead

const population = {
	'0:0': { x: 0, y: 0 },
	'2:0': { x: 2, y: 0 },
	'0:1': { x: 0, y: 1 },
	'1:1': { x: 1, y: 1 },
	'1:2': { x: 1, y: 2 }
};

countAliveAround({ x: 1, y: 1 }, population);
// 4
Now we can implement the evolution rules.
Cells’ Evolution
The Game of Life is a cellular automaton. This means that the evolution is discrete and we can split it into steps.
The initials population is the first step of the evolution. To get the next step we need to simultaneously apply the game rules to all cells.
Let’s create a class to store the world settings and the current population. Its constructor will take the world size in cells and the initials population.
// life/world.js

export class World {
	constructor(rows, columns, population) {
		this.rows = rows;
		this.columns = columns;
		this.population = population;
	}
}
The evolution is going to be implemented in the evolve method. It will store the evolved object that is going to be a population on the next step. We will replace the current population with the evolved one afterward:
// life/world.js

export class World {
	// …

	evolve = () => {
		const evolved = {};
		const checked = {};

		// TODO: Transformations here...

		this.population = evolved;
	};
}
Then we will check each cell and determine whether it’s going to survive, get born, or die:
// life/world.js

evolve = () => {
	const evolved = {};
	const checked = {};

	Object.values(this.population).forEach((agent) => {
		const alive = countAliveAround(agent, this.population);

		if (alive === 2 || alive === 3) {
			const { x, y } = agent;
			evolved[`${x}:${y}`] = agent;
		}

		// TODO: Check neighbors...
	});
};
We add the surviving cells to a new evolved population, which will then replace the current one. We need a separate object so that we don’t change the current population as we process it.
We can’t change the current population, because that change would affect the recalculation of other cells, and that shouldn’t happen. We need to apply the rules to all cells at once in the current population. And if the rules are applied by overwriting the current population, this condition will no longer hold.
In addition to the cell itself, we also need to check its neighbors. If a neighboring cell has 3 living neighbors, it is born:
Object.values(this.population).forEach((agent) => {
	// …

	neighborsOf(agent).forEach((neighbor) => {
		const { x, y } = neighbor;

		if (checked[`${x}:${y}`]) return;
		checked[`${x}:${y}`] = true;

		if (countAliveAround(neighbor, this.population) !== 3) return;
		evolved[`${x}:${y}`] = createAgent(x, y);
	});
});
To avoid re-checking of already checked cells we store them in the checked object.
Intermediate Result
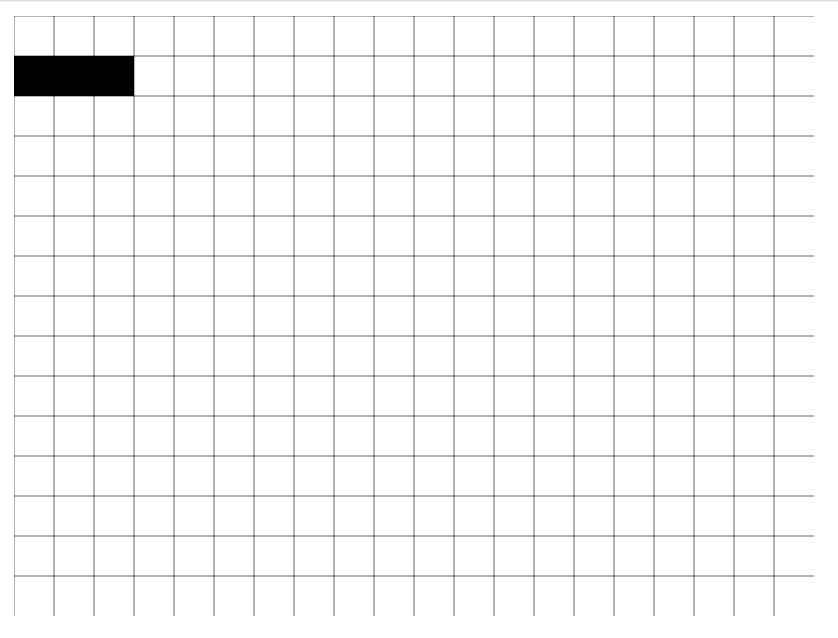
Let’s check how all of this works. The easiest way to check that the game works properly is to use an oscillator. Those are patterns that repeat themselves after a fixed amount of evolution steps.
The smallest oscillator is blinker. It oscillates between the vertical and horizontal lines with length 3.

To recreate it we use an HTML page with a link to the main script. This script will import all other scripts:
<script type="module" src="./main.js"></script>The type="module" attribute tells the browser that we are going to use JS modules. Inside a JS-module we’ll be able to use imports and latest syntax.
Let’s create a world and population in the form of a horizontal strip of 3 cells:
// main.js

import { World } from './life/world.js';

const population = {
	'0:1': { x: 0, y: 1 },
	'1:1': { x: 1, y: 1 },
	'2:1': { x: 2, y: 1 }
};

const world = new World(5, 5, population);
Then, try to evolve the population a couple of times to see how it evolves. The blinker pattern has a period of 2, so every 2 steps it should repeat its start configuration.
// main.js
// …

world.evolve();
console.log(world.population);
// {1:0: {x: 1, y: 0}, 1:2: {x: 1, y: 2}, 1:1: {x: 1, y: 1}}

world.evolve();
console.log(world.population);
// {0:1: {x: 0, y: 1}, 2:1: {x: 2, y: 1}, 1:1: {x: 1, y: 1}}
…And yes! The population goes back to the start on the 2nd step.
However, it isn’t convenient to observe changes without the graphical representation. Let’s build a drawer.
Population Rendering
We’re going to use canvas to render the population. Add the element on the page:
<canvas width="400" height="300" id="canvas"></canvas>
<script type="module" src="./main.js"></script>
We will create another module called Drawer. It will handle all the work related to updating the canvas element and rendering cells:
// dom/drawer.js

export class Drawer {
	constructor(kernelSize) {
		// Find the element:
		const canvas = document.getElementById('canvas');
		const context = canvas.getContext('2d');
		const [width, height] = [canvas.offsetWidth, canvas.offsetHeight];

		// Save references to settings and the drawing context:
		this.context = context;
		this.kernel = kernelSize;

		this.width = width;
		this.height = height;

		// Calculate the amount of rows and columns on the field:
		this.rows = Math.floor(height / this.kernel);
		this.columns = Math.floor(width / this.kernel);

		// Normalize the image for displays with high DPI:
		this.normalizeScale();
	}
}
For DPI normalization we’re going to use this snippet:
// dom/drawer.js

export class Drawer {
	// …

	normalizeScale = () => {
		const { devicePixelRatio: pixelRatio } = window;

		if (pixelRatio > 1) {
			canvas.width = this.width * pixelRatio;
			canvas.height = this.height * pixelRatio;
			canvas.style.width = `${this.width}px`;
			canvas.style.height = `${this.height}px`;
			this.context.scale(pixelRatio, pixelRatio);
		}
	};
}
The world’s grid is going to be drawn with the lineTo method:
// dom/drawer.js

export class Drawer {
	// …

	drawGrid = () => {
		this.context.strokeStyle = 'rgba(0,0,0, 0.3)';

		// Vertical grid lines:
		for (let i = 0; i < this.width; i += this.kernel) {
			this.context.beginPath();
			this.context.moveTo(i, 0);
			this.context.lineTo(i, this.height);
			this.context.stroke();
		}

		// Horizontal grid lines:
		for (let j = 0; j < this.height; j += this.kernel) {
			this.context.beginPath();
			this.context.moveTo(0, j);
			this.context.lineTo(this.width, j);
			this.context.stroke();
		}
	};
}
With fillRect, we will draw black squares where alive cells should appear:
// dom/drawer.js

export class Drawer {
	// …

	drawWorld = (world) => {
		this.context.fillStyle = '#000000';

		world.agents.forEach((agent) => {
			this.context.fillRect(agent.x * this.kernel, agent.y * this.kernel, this.kernel, this.kernel);
		});
	};
}
Also, add a getter to the World class for a more convenient way to get a list of alive cells:
// life/world.js

export class World {
	// …

	get agents() {
		return Object.values(this.population);
	}
}
And then call the drawer in the main module:
// main.js
// …

const drawer = new Drawer(20);
const world = new World(5, 5, population);

function liveGeneration() {
	drawer.drawGrid();
	drawer.drawWorld(world);
}

liveGeneration();
Blinkers appear on the screen, yay!
Let’s evolve it:
// main.js
// …

function liveGeneration() {
	world.evolve();
	drawer.drawGrid();
	drawer.drawWorld(world);
}

liveGeneration();
Cool! It behaves as it’s supposed to.

Of course, we won’t evolve the population manually all the time. To automate it we’ll use the game loop.
Game Loop
The game loop is a pattern for handling the user input and screen re-rendering in game development. In our case, it will handle evolution updates.
Create an IIFE in the main module:
// main.js
// …

(function gameLoop() {
	liveGeneration();
	window.requestAnimationFrame(gameLoop);
})();
This function starts evolution and then asks the browser to call itself before the next repaint.
If we run it right now the screen will become black very fast because we don’t reset the previous drawings before painting again 😃
Let’s create a method for resetting the image on canvas:
// dom/drawer.js

export class Drawer {
	reset = () => {
		this.context.clearRect(0, 0, this.width, this.height);
		this.drawGrid();
	};
}
Then call reset before starting a new evolution step:
// main.js

function liveGeneration() {
	drawer.reset();
	world.evolve();
	drawer.drawWorld(world);
}

(function gameLoop() {
	liveGeneration();
	window.requestAnimationFrame(gameLoop);
})();
And, finally, to be able to set up the interval between evolution steps we’ll add a timeout:
// main.js

(function gameLoop() {
	liveGeneration();
	setTimeout(() => window.requestAnimationFrame(gameLoop), 100);
})();
Now we can run the program to see the result:
Random Population
Blinker isn’t very interesting to observe 😅
Let’s create a function to filling the initial population with cells with random positions.
In the populateRandom function we pass the number of rows and columns for the world we want to populate. Then go through each cell of the grid and run a random number generator, which will return a random binary value (true / false). If it returns true, we add a live cell to the population, if not, we do nothing:
// life/population/random.js

export function populateRandom(rows, columns) {
	const population = {};

	range(columns).forEach((_, i) => {
		range(rows).forEach((_, j) => {
			if (Math.random() <= 0.5) return;
			population[`${i}:${j}`] = createAgent(i, j);
		});
	});

	return population;
}
Then use this function’s result as an initial population for a new world:
// life/world.js

export class World {
	constructor(rows, columns, population = populateRandom(rows, columns)) {
		this.rows = rows;
		this.columns = columns;
		this.population = population;
	}

	// …
}
And update the min module a bit:
// main.js

const drawer = new Drawer(10);
const world = new World(30, 40);

function liveGeneration() {
	drawer.reset();
	world.evolve();
	drawer.drawWorld(world);
}

(function gameLoop() {
	liveGeneration();
	setTimeout(() => window.requestAnimationFrame(gameLoop), 100);
})();
…And we’ll have implemented the Game of Life 🥳
To Be Continued
We created the basics for populations evolution. However, we can’t yet create stable “signals”.
In the second post, we will research some of the patterns in the Game of Life and figure out the most suitable for creating a logic gate; then we’ll implement NOT, AND, OR, and XOR gates.
In the last post, we’ll implement the binary half adder and binary full adder circuits that we will use to compose the calculator.